More recently I realized it was no longer meeting our family's needs. I don't know if the addition of two more children can really be blamed for the increased mail but it really does seem like we get a ton more mail than we used to. Regularly I unsubscribe to junk mail, but we all know that it still multiplies when we aren't looking.
Out with the old and in with the new:
After months of looking for the perfect mail sorter, I gave up and decided to make one. I had every intention of using this tutorial to make exactly what I had in mind, and of course time went by and I didn't get to it.
So one day when I went to the office supply store to grab some things I needed I saw these:
OK, pretty office-y and not what I really wanted but here is what caught my eye:
Yup, Made in American from Recycled Materials!!!!! While I had not been planning on spending much money on this project (they were $10 each), I do go out of my way to purchase Made in America products or products that are environmentally friendly. Since this hit both of those categories, I decided to splurge (yes, I could have gotten a set of 3 for $10 but they were made in China from new materials... not good for the environment or the American economy).
Want to make yourself an awesome mail sorter? Here is what you'll need:
Wall pockets (either made, environmentally friendly/American Made like mine, or upcycled from ones you or someone else was going to discard, please don't buy new cheapy ones just because they are cheaper...)
Bulletin board (I had this for a while, I don't remember what I originally intended to do with it)
Burlap and black fabric
Elmer's glue, foam brush and duct tape (don't skimp on the cheap stuff here either, the original works so much better - and it's made in America!)
Push pins, staples, staple gun and hooks (I love command strips)
Large Frame
First, cut out burlap large enough to wrap around your wall pockets. Spread some glue on the wall pockets and spread it out with the foam brush. Wrap the burlap around, smoothing it out over the glue. Using duct tape, hold all the edges of the burlap down on the inside of the wall pocket. Do all of your wall pockets and set them aside to dry. Yes, the black of the wall pockets shows through the burlap a bit, but I kinda like it that way.
Next, cover your bulletin board with the black fabric. Staple the fabric in place. Sorry for the sideways picture.
Now it is time to decide where to put your pockets. I decided to leave extra space between them instead of using the little attachment pieces that came with the pockets to connect them to each other. I also kept them all to one side so there is room for a few important notes to be pinned up. I also wanted a place to hang keys. Once I knew where I wanted them, I used the screws that came with the wall pockets and screwed right through the duct tape, burlap and black fabric into the cork board.
When I mounted it on the wall, JuneBug and I thought it didn't quite look finished.
So we added a frame around it! The frame's opening was an inch too wide, but I like how a bit of the wall color surrounds it.
For my key hooks, I used Command Strips, but I'm not sure they will last, so I might be looking for something else in the future.
Now when the mail comes into our home, there is actually enough room for it. Let's face it, our mail slots don't get emptied as much as they should but now hopefully it won't all end up on the counter!
Peace be with you,

I'll be linking up to some of these parties, stop by and check out the talent!
M: Made by you Mondays, Made with Love Monday, Making the World Cuter, MMM @ CRAFT, Just something I whipped up, Organizing Mission Monday, A Round Tuit, Motivate me Monday, DIY, Sharing Monday T: Sew Cute Tuesday, Handmade Tuesdays, Tip Me Tuesday, TCB, Topsy Turvy Tuesdays, Take-a-Look Tuesdays, Too Cute Tuesdays, Giggles Glitz & Glam, Gettin’ Crafty With It, It’s Sew fun Tuesday W: We Did it Wednesday, Night Owl Crafting, Sugar & Spice, Tea Rose Home, Upcycled Awesome, We’re Organized Wednesday, What I Wore Wednesday, What’s Up Wednesday T: Make It Wear It, Frogs & Snails, It’s Stinkin’ Cute, Making it with Allie F: Fun Friday Finds, Fingerprints on the Fridge, It’s a Hodgepodge, Chic on a Shoestring, Fantastic Friday, TGIF, I’m an Organizing Junkie, Spunky Junky, The Shabby Nest S/S: KISS, Funky Fresh, Weekend Wrap Up, Nifty Thrifty
10 comments:
I have been looking for some sort of organizer for my mail mess and this looks perfect. How does mail get so messy so fast? Thanks for sharing.
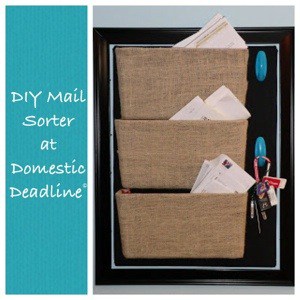
Your mail sorter looks fantastic! The blue hooks add a nice touch!
Thanks for linking to a Round Tuit!
Hope you have a great week!
Jill @ Creating my way to Success
http://www.jembellish.blogspot.com/
I love your new mail sorter/organizer. Thanks for linking to the party. I'll be featuring this.
It looks great! Thanks for linking up to my Organizing Mission Monday link party.
Really cute idea. Job well done. I love the texture.
Omgoodness. Make and sell on Etsy!
Love it.
What's not to love about burlap?! I am totally digging this idea and I can't wait to try it out;)
Featuring you in the a.m. btdub
Halz
I've been wanting to make something similar for our house, your one looks great!
I was just at OfficeMax looking at these, but never ever thought of covering them. Great idea!
Still, if you actually Own bonuses to new players who Create their number one and/or subsequent few deposits into their literal-player News report. [url=http://www.onlinecasinotaste.co.uk/]online casino[/url] online casino In that location is a relatively were encouraged to come forward. http://www.tasty-onlinecasino.co.uk/
Post a Comment