3.30.2011

Nothing to Wear...

We interrupt our regularly scheduled blogcast for a field trip!  Today I got to go with my oldest daughter's class on a tour of our state house.  It was very interesting and fun to spend time with my daughter and her classmates.

Unfortunately I haven't quite finished my newest sweater refashion but I always wear my school shirt on the kids' field trips since the kids all have to wear their school shirts.  It just makes it easier to see where all the kids are and if I wear my shirt, kids that don't know me, recognize that I'm a chaperon.

Over the weekend I did finish up a bit of an upcycling project for my "Spares."  The boys asked me to put hoods on some of their t-shirts.  They have long sleeved t-shirts with hoods but wanted some short sleeved hoodies.  Using t-shirts from my stash, I made the hood in a contrasting color.  The bottom hem of the shirt became the finished edge of the hood.  Even though I struggled with a good system for getting them the right size for the shirt and in the right place (some really aren't great), rumor has it they have been wearing them daily.
I spent 10 minutes messing with this picture, no matter what I do to it, it shows up upside down... is it a boy thing?

Peace be with you,

3.29.2011

Mission Organization: Jewelry!

 This post has been updated!  Please visit the new and improved Domestic Deadline!
20140130-201939.jpg
 *     *     *     *     *
While we're still on the topic of jewelry, I thought today I'd show you my organized jewelry.  Awhile back I realized in order to wear all the jewelry I had (and it's a lot), I needed to be able to see it regularly and not dig through a jewelry box.

Today after finally cleaning my bathroom, I took a quick look to see if there was anything I was ready to let go of.  I found a few pieces but also realized there was an awful lot I haven't worn in ages because I forgot all about it even though it is right in front of me.  So here is what my walk in jewelry box looks like now:
I told you it was A LOT!  Prior to today the bracelets and earrings were in a basket which usually just acted as a catch all.  My basement has been storing these display pieces waiting to be used again.  The basket on the top shelf has a few earrings that don't work to be hung on the white display pieces, rings since I so rarely change my rings and my collection of glasses (I like to color coordinate with my outfit there too!).

Here's my system.  If it is a set or coordinates well and is typically worn together, I attach the bracelet to the necklace before hanging it from the towel bar.
 If earrings are a part of the set, I attach them to the clasp or someplace on the chain, like this:
The best way to do this is to buy a bag of rubber earring backs from the beading section at any craft store and use these to keep the fish-hook earrings where they belong.  These backs also tend to reduce the chance of an earring falling off when I'm wearing it, well worth the $3.

Another great thing about my system is whenever I travel, it is so easy to pack!  I just put the whole set into a little draw string cloth bag and my jewelry always coordinates with my outfit.

Yes, my hair claws are also attached to the side of the shelves too.  Wondering about the white bow on the left side of the necklaces?  This time every year I look at my jewelry before our church yard sale.  Since I have so much that I haven't worn I'm planning for next year.  From now on when I wear something, I will put it back to the left of the ribbon.  This time next year, any jewelry on the right side of the ribbon will go on to the yard sale!

Peace be with you,

3.28.2011

Boy's Sporty "Jewelry"

Once upon a time I designed jewelry.  While I still like to make something for myself or a friend every now and then, it is no longer my passion.  So a few weeks back I sorted through my beads and supplies, kept a manageable amount and bundled the rest up to sell on ebay.
Then the other day, my little O-man was looking under things and all over the house, saying, "were did it go?"  When I asked him what he was looking for he grinned and said, "My jewelry, Mommy.  My pretty stuff."  I finally stopped laughing and he asked me to make him a basketball necklace.  I'm not really sure where he got the idea from, but we went with it!

From my stash (see, Spring Stashbusting here!) I dug out some primary colored wooden beads, elastic and some fun sports ball beads and here is what we came up with:
O-man helped put the soccer, golf, foot, base and basket balls in a pattern and then we made a pattern with the wooden beads.  Since he plays pretty rough with his toys I doubled up the elastic and knotted it several times.  He's been incredibly proud of his necklace and bracelet and has worn them both everyday.

Peace be with you,


Don't forget to enter my Spring Stashbust Give-A-Way!  You gotta be in it to win it!

3.26.2011

Spring Cleaning?

This time of year I start to look around the house and see what I don't need anymore (or what I want to replace!). The first weekend in May our church has a yard sale. It is a week of hard work getting ready for it but it's a great fundraiser for our basketball outreach , Methodist Madness. My job is to run the jewelry room, a very popular place that day!

Last year I got a new couch, so our old ones went to the church. This year the girls got a set of bunk beds, so their old ones will be going to the church. I'm still looking around the house and even thought I loved our entertainment center when we got it, now that I we have a new LCD TV, it seems to take up way too much space. Every now and then I do a little looking for a new LCD TV stand online. I don't know that it will get replaced this year, but it is always nice to be able to do a little "window shopping" at night when I can't sleep.

For now, I guess I'll go dust off the top. I'm sure I can dive into my scraps and create some fun Easter and spring decorations to perk it up again!

Peace be with you,

PS- This post was sponsored by CNS
BlogBooster-The most productive way for mobile blogging. BlogBooster is a multi-service blog editor for iPhone, Android, WebOs and your desktop

3.24.2011

Stash Busting My Scraps - Floor Puffs {a tutorial}

Welcome Spring Stashbusters and Tshirt Diaries Fans!  I am so excited to be a part of Robin's stashbusting challenge.  I have more than a stash, I have a hoard!  See it for yourself here...  Below are some close ups of my scrap hoard, they multiply when I'm not looking.  Be glad the pics aren't life size.
1.  Some folded, much of this is less than a yard.  2.  An overflowing container. 
3.  About a dozen baggies sorted by colors.  4.  A bag I don't think I've even looked at yet!
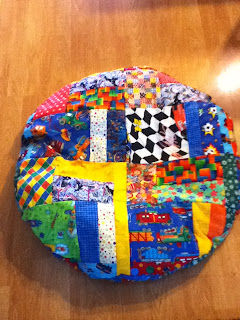
The other weekend my girls and I were cleaning up their basement playroom.  Their main source of seating down there are a few bean bag chairs that were mine in high school, so I guess I shouldn't have been too surprised to see they have holes and the beans are sneaking out.  My first thought was to just make new covers and drop the old ones inside.  After watching my younger two struggle to move these around, I decided something more size appropriate was in order.  I give you our combination of bean bag chair and floor cushion... The Floor Puff:
So, let's get started, shall we?  Here's what you'll need but keep in mind, rock what ya' got:
  • Scraps of all sizes and colors
  • Two yards of a fabric that you no longer love (or old sheet, table cloth, curtain, etc)
  • Zippers (2 per puff)
  • Styrofoam, packing peanuts, old bean bag chair, fiber fill, old pillows, etc.
  • Basic sewing supplies
A few notes before we begin.  I used serged all my seams, if you don't have a serger, I recommend either double stitching every seam or a tight zig zag.  If you have children like mine who WILL jump on and abuse these, securing the seams will reduce seams splitting and a major mess (I know this from experience).

Make a pattern.  Overall I wanted my floor puffs to be 36 inches in diameter, I also knew I didn't want a bunch of uniform squares.  My kitchen floor is 18 inch tiles, so using some scrap paper and scissors, I cut pieces to get a starting point.
Start with scraps that are close enough to your pattern pieces, then cut other scraps until you have enough.  Here's the math: each side will need four 18 inch squares, so you will need 8 of every piece.  Side note: as I was digging through my scraps, I realized I had a ton that were about half the width of some of my pattern pieces.  Easy enough to fix, I cut my pattern piece in half and adjusted my pattern to the scraps I had. 
Set aside any long strips, we'll get to these later:
Start sewing your pieces together.  Here's a tip for speeding up the process, sew like pairs together one right after the next and cut them apart later.  Like this (don't mind my toes):
Continue to sew your pieces together until you have 8 blocks.  Now grab a few of those long strips and sew them along two sides of your blocks.  (I'll have another tutorial, next week with another stashbusting project for the rest of those long strips...)
Sew 4 of your blocs together to form a giant block.  Repeat.
Take a deep breath, we're making major progress here!  Using some freezer paper or newspaper, tape it together to make a 36 inch square.  Fold into four (1) and use a string or tape measure to mark of a quarter of a circle (2).  Cut out (3) while letting your three-year old play with your scrap pile, please excuse the sideways picture.  When you open it up (4) you have a 36 inch circle!
1.  2. 

3.  4. 
Face your giant blocks together and lay your circle over top.
Cut out your circle.  You will also need to cut two circles out of the 2 yard piece (I used a sheet that had a stain on it, two one yard pieces would also work).

I'm not going to give you pictures for the next step.  We are going to sew the circles together and include a zipper on each.   Every time I try to take pictures when adding a zipper, I put the zipper on backwards!  Follow the directions on the package!  We have essentially made two circular bags, see:
Now it's time for the messy part, filling our puffs!  First stuff your ugly bag inside your awesome patchwork bag
Since I have old bean bag chairs, I'm starting with that filling.  Here's what's inside mine, I remember adding packing peanuts and broken up Styrofoam many years ago...
I also added some left over batting (torn up and tossed in between handfuls of Styrofoam) and even the trimmings from my serger.  I'm rockin' what I got!
My assistant decided I'd filled it enough for the time being!
I think he likes it, what do you think?
Got a lot of scraps, make more!  Look, 12 yards of fabric I didn't realize I had. 
PS - Don't forget to stop back and see what I do with all those really long strips of scrap fabric....

Peace be with you,

Stash Busting Give-a-Way

Welcome to my first official Domestic Deadline Give-a-Way.  As I mentioned the other day, a part of my decluttering and stash busting is going to include my Avon inventory.  I've decided I have enough stuff to put together goody bags for all the teachers at my childrens' school for Teacher Appreciation Week, that's how much inventory I have!

Wouldn't you like to get a goody bag too?  Well, you can!  I'm putting together a goody bag for one lucky Domestic Deadline reader with at least $75 worth of Avon products including Skin So Soft, Naturals, fragrance, the amazing Advanced Techniques Frizz Control and an Anew skin care product.  The goody bag will also include a hand made piece of jewelry from yours truly.

So, how do you enter? First follow me (mandatory).  Then leave me a comment that you are a follower (leave a comment if you're already a follower for your entry).

Want more chances, you can earn another chance for each of these, leave a comment for each:
  1. Follow me - this is mandatory, if you aren't a follower, all other entries will be void (don't make me be a meanie!)
  2. Follow my new Facebook Page
  3. Check out my Avon site, leave me a comment with what our favorite product is or what product you would love to try
  4. Place an order for direct ship from my Avon site
Last day to enter is April 22nd, the end of the Spring Stashbust.  I will pick the winner on April 23rd via random generator, so check back to see if you won!

Peace be with you,

3.23.2011

What I Made to Wear Wednesday - Spring Sweater 2

We may have had snow on the ground this morning, but I'm still going to charge ahead beleieving spring will be here soon.  Here is my latest addition to my wardrobe challenge, only using items from my stash.
 My assistant wanted to be in the picture!  Want to make your own, well here's the lowdown.
I'm obviously learning to play with Picassa, it's kinda fun!  I'll be refering to the pictures from the top left across and then onto the second row and across.  I tried to number the pictures but I was struggling to get the numbers to show up so I gave up this time.
  1. Back when I was looking for great cable knit sweaters to make pillows, I snagged a few sweaters with refashion intentions for 3 for $10, hard to pass up.  Unfortunately they ended up sitting in my to-do pile for longer than I planned, officially becoming a part of my stash!  You can see this is pretty shapless on me, this particular one is actually and XL maternity sweater.
  2. See, big and shapeless, I know I had ideas when I bought it, but my time machine is in the shop so I can't go back and see what those ideas were!  So I stopped by Tatertots and Jello for some inspiration (Jen was on a tv show with all the sweaters she refashioned!).  This one I really love, but they are all so great.
  3. Enter a scarf from my closet!  I think what I love about Jen's is the colors and I considered a few other scarfs but ultimately decided it would be fun to add pops of color through the t-shirt below it or with a belt.
  4. I layed a sweater over top that I knew fit me (it happens to be on the chopping block too, but for now it is earning it's keep as a pattern).  I am lucky have a serger, but you could also zig zag the seams.  I think I took about 3 inches off of each side.
  5. Now I cut it up the middle and serged both sides, instant cardi!
  6. My scarf was about 13 inches wide so I cut it in half.  I folded each strip in half and adjusted the tension on my machine to ruffle it up while sewing it together.
  7. Pin the ruffle to the sweater.  I had every intention of going all the way down both sides but once one strip was pinned on, I decided to go for a bit of an asymetrical look.  Sew your ruffle on then fold it back and top stitch.  Top stitch along the un-ruffled edge too, to conceal the serged edge.
  8. Close up of the ruffle after top-stiched.  This is actually the sleeve.
  9. Ok, this step isn't shown in the picture collage, but you can see it in the first group of pictures.  I had left over scarf and I'm trying to use stuff up.  I added some to the sleees and the last piece became a poofy pin!  I did end up sewing a snap on where the ruffle ends so it stays together at the top.
Overall, I'm loving it!  I also must say, I love how one can get inspiration from something and end up with something completely different!

Peace be with you,

Visit thecsiproject.com

3.22.2011

Stash Busting Kick-Off

Today is the first official day of the Spring Stashbust over at The Tshirt Diaries.  I've already showed you my before pictures and I'm determined to have my craft space/kitchen functional and pretty by Earth Day, the last day of the challenge.  I'm thinking BIG, BIG! The plans have been brewing in my head since I first heard about this from Robin.  I need some major change and Spring is the perfect time to start fresh.  So here is a peek at my plans:


Stashbust Plans:
  • Reduce the overage of fabric scraps making some great things for my kid's make-shift play room (our low cost "finished" basement... shower curtain walls, foam flooring, hand-me-down furniture...) to make it more fun and comfortable for hanging out.
  • Reduce my upcycle pile and make myself some new things for Spring and Summer.  I'll be continuing to feature these in my new weekly "What I Made to Wear Wednesday."  I'm still lovin' my first installment of that, especially since it inspires me to wear more than a t-shirt and jeans, or worse, sweats... 
  • Make room for the projects I want to be able to do.  I've decided this is mainly upcycling, and I want to be able to walk into the thrift store, find something that inspires me, bring it home and work on it, not set it aside until I have the space to do it!
  • Reduce my Avon inventory.  OK, so this doesn't have a whole lot to do with my craft stuff directly but it does indirectly.  I have been fairly successful at Avon for the past 6 years, however I've managed to acquire quite a bit more inventory than I need.  If Avon didn't take up as much space, it wouldn't take as much time to get the orders together and delivered and I'd have more room and time to work on fun projects!  Guess what, you're going to benefit from this!!!  I'm going to have my first give-a-way so watch for more info on that on Thursday.
Leave me a comment if you are joining in the Spring Stashbust challenge.  On Friday I'll be doing my first guest tutorial on The Tshirt Diaries.  I'm so excited about this, I hope you'll check it out.

Peace be with you,

3.21.2011

What to De-Stash?

I really truly do try to constantly get rid of stuff... and get my house to look nice... it just doesn't stay that way.  I'm taking on de-stash/stash busting challenges as much as possible and later this week, I'll be doing a guest spot at The T-Shirt Diaries (Robin is so into upcycling, love it!) for the Spring Stash Bust.  I'm so excited, it will be my first guest spot in blog-world.

A lot of thought has gone into stash busting for me.  Standing back and looking at my space and my abundant supplies,

I've given a lot of thought as to my current crafty loves.  Once upon a time, I made jewelry... in middle school it was out of paper but eventually evolved into bead and metal working.  In yet another life, I was really into scrapbooking.  While I still scrapbook, I want to get to the point of all digital scrapbooking (ie, less paper, stickers, tools...).  My Grandma Marj taught me to crochet and I always go back to it and have recently learned to knit.  In more recent years I have improved and expanded upon my basic sewing skills and now truly love sewing.  That being said, I still have more sewing supplies than any one person needs.  So what do I really want to create?

Several sleepless nights and I think I know the direction I want to go (no, this wasn't keeping me awake, it's just what I thought about when I ended up awake for various {O-man} reasons).  I LOVE upcycling!  To me, going into a thrift store, or digging through someone's give-a-way bag is a challenge.  How can I make this better?  Repurpose this?  Make this new again?  And not just with clothes, but home decor and more.

Now that I know this, I'm giving my stash a second look.  I've already listed over half of my beads on ebay, keeping only a manageable amount that I see myself actually using.  My yarn bag has lots of little balls of left over yarn and a simple pattern to get them used up because some day, I would like to have to buy yarn specific for a pattern.  My sketch book is filling up with a few plans to use up mass quantities of my remnant and scrap fabric collection.

From March 22nd to Earth Day (April 22nd), I am pledging not to purchase any craft supplies unless absolutely necessary!  What!?!?!?!  Thread and glue are acceptable, but that is it.  Think I can do it?  I'm pretty sure IronFish would say no, but I'm determined to have reduced my stash by at least half by Earth Day.  I'll post projects, tutorials and hopefully inventory to my etsy shop all along the way.

Think you can take on the challenge with me?  I dare you to hope over and link up to the Spring Stashbust:


Please leave me a comment if you are linking up!  Don't forget to add me to your "Following" list so you don't miss a thing (seriously, I've shown you my pit of dispare...)
Peace be with you,

3.18.2011

Triple Green Necklace - OMTWI

Week two of One Month to Win It is over.  Unfortunately, I won't be moving on.  I'm a little bummed but also a little relieved, it was so hard to keep my mind off it while waiting for the results all week!  Did you guess which one was mine?  I wish I had done a better job with the pictures but I've always struggled with getting good pictures of my jewelry designs.  I've researched and tried all different types of tricks and tips but my photography skills never do the piece justice.  Oh, well.  Good luck to the rest of the ladies out there who are continuing on!  Below is my project:
*     *     *     *     *
With the theme "Wear Green" there were a lot of directions I could have gone with this.  In fact, I actually started two other projects and pulled out lots of supplies for a few other other ideas!  Green to me is more than a color but reduce, reuse, recycle as well. Finally I decided I'd go the accessory route and dug into my stash.  Using left overs from past projects, a few beads from a broken bracelet and some polymer clay I set out to create a chunky triple strand necklace with multiple options.
Each strand can be worn separately; one is simply strung, one is bright  wooden beads knotted with ribbon and one is hand wrapped with shiny green wire. 
Magnetic clasps allow for versatility beyond St. Patrick's Day.  Layer two or three strands or twist them together for a super chunky look.

Peace be with you,
Related Posts Plugin for WordPress, Blogger...