Showing posts with label Patterns. Show all posts

12.05.2011

Creating Christmas - Mitten Pillow

 Creating Christmas at The Girl Creative
Welcome to Day 3 of Creating Christmas with The Girl Creative.  Check out Day 1 and Day 2 if you missed them.

The point of Creating Christmas is to not just pin something, create something.  Like the rest of you, I've been pinning tons of things that give me inspiration and have a whole Pinterest board dedicated to all the awesome Christmas ideas that have inspired me.


One particular idea that I decided needed to be created is the mitten pillow in the back of this picture:
 
The $69 price tag is a little steep for me and since mittens can go for the whole winter season, I'd rather go with my color scheme and my winter pillows that I made last year from thrift store sweaters
Originally I planned on going through my fabric scraps, but a fever left the little man in my lap yesterday and while I've sewed with him in my lap before, he just wasn't up for that... crocheting it is then!  Don't worry, I used yarn scraps.  Now, bear with me, I have never really written a crochet pattern before.  I made the first one up as I went along, wrote it down, and then tried to follow it.  Please feel free to ask any questions.

Crochet Mini Mittens:
With worsted weight yarn and an H hook, chain 12.
sc = single crochet, HDC = half double crochet, DC = double crochet
Row 1: in 2nd ch from end, DC, counts as 1st stitch.  DC to end, 11 stitches, turn
Row 2 of the thumb: ch 2, DC in next 2 DC, turn
Row 3: HDC, DC, HDC, turn
Row 4: Repeat row 3, turn
Row 5: 3 HDC, turn
Row 6: SC to the end and down around the inside of the thumb back down to Row 1 and slip stitch to connect, turn
Rows 2-5 of hand:  ch 2, DC to end, 8 stitches, turn

Row 6-7:  sc, HDC, 4 DC, HDC, sc, turn
Row 8: sc, 5 HDC, sc to end and down the hand back to the base (no real count, some DCs I did 2 stitches, some only 1, just watch that it lays flat).
Row 9-10: ch 2, DC to end, about 10 stitches, make sure it lays flat, this is the palm portion of the mitten.
Optional: add a row of fringe or an alternate color.
I love the burlap of the pinned version, but muslin was available.  Since I'm constantly stash busting and trying to use what I have and not buy something new, muslin it is!  Plus, it's softer anyways.  I'm thrilled with the result, yes, it needs a bit more stuffing, just have to find where I put it.
Plus, it looks great with my other pillows:
Now it's time to go back to Pinterest and see what else I pinned that needs to be created this week!

If you like what you see,
I’d love for you to follow me!
Peace be with you,
 
I'll be linking up to some of these parties, stop by and check out the talent!
M: Made by you Mondays, Made with Love Monday, Making the World Cuter, MMM @ CRAFT, Just something I whipped up, Organizing Mission Monday, Creative Me Monday, A Round Tuit, Motivate me Monday, Jam Hands, Must Try Monday T: Sew Cute Tuesday, Handmade Tuesdays, Tip Me Tuesday, TCB, Topsy Turvy Tuesdays, Take-a-Look Tuesdays, Too Cute Tuesdays, Giggles Glitz & Glam W: We Did it Wednesday, Night Owl Crafting, Sugar & Spice, Tea Rose Home, We’re Organized Wednesday, What I Wore Wednesday, What’s Up Wednesday, Wow Me Wednesday, Share the Wealth, Real Momma Real Style, Your Whims Wednseday, Whatever Goes T: Make It Wear It, Frogs & Snails, It’s Stinkin’ Cute, Making it with Allie, Things I’ve Done, Everybody’s Creative Endeavor F: Fun Friday Finds, Fingerprints on the Fridge, It’s a Hodgepodge, Chic on a Shoestring, Fantastic Friday, TGIF, I’m an Organizing Junkie, Spunky Junky, The Shabby Nest, While He Was Napping, Upcycled Awesome S/S: Get Schooled Saturday, KISS, Funky Fresh, Weekend Wrap Up, Nifty Thrifty, Creative Bloggers, Six Sisters

5.01.2011

Spring Top Sewalong Part 1

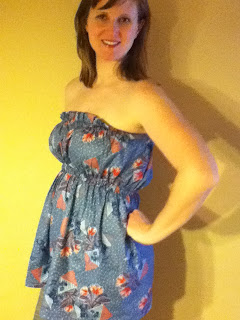
I wore my new tunic on Friday and got quite a few compliments!  It was so comfy and it's always fun to get compliments on something you made, isn't it?  Here's a few better pics of the finished top:

So I've decide to enter it in the the Spring Top Sewalong over at Made by Rae! 


I can enter up to 3 different tops they all have to be for me, not for the kids.  It's making me think and since I'm still trying to make something new for myself each week, goes right along with my plans (love when that happens).  What better time than an insanely busy week to add another project to, right?!?!?

The wheels are spinning, I just hope they produce something good.  I'll keep you posted.
Peace be with you,

I'll be linking up to several of these parties this week!

4.29.2011

Let's Talk Patterns

Shall we?  My grandma taught me to crochet when I was 6 years old but she never taught me to read a pattern.  By 5th grade I'd crocheted sweaters, leg warmers and more all by making it up as I went along.  Around 3rd grade I used my old curtains and hand sewed a dress that despite my mom's protests, I wore to church.  So, in late elementary school and middle school my mom taught me to sew.  She attempted to teach me to read a sewing pattern.  My aunt taught me more about sewing and actually designed smocked dresses and patterns.

But, the damage was done, I'd already taught myself to look at the end product and figure out the steps in between.  Trust me, this really comes in handy most of the time, however, I can get pretty frustrated with myself when I am trying to go by a pattern.  Since last summer I have actually been trying to follow patterns more closely when I m using them because I would love to design my own patterns some day.

Why am I telling you all this?  Well, I got the opportunity to be a pattern tester for Jenny over at Seamingly Smitten!  It was so much fun to try out a pattern for her and I must say, it is a great pattern!  She said it would take a beginner sewer about an hour and a half.  I forgot to actually time myself, but I would say it took me a bit under an hour, in between making dinner all with the help of my trusty three-year-old assistant.  Best part is I have something new for myself to wear today, which is great because we are supposed to have awesome weather (finally).

So, here is the pattern I tried... The Laurie Clair Tunic

How cute is her sister, Laurie?!?!?  I so totally wish I could live down the street from my sister(s), they are sooooooooo lucky.  Want to see how mine turned out?
Excuse the plunger... It's a clean one since O-man uses it to play "plunger basketball" but we still put it back in the bathroom!
Here it is with a cardi over it, it's going to be nice, but it's only about 60 degrees right now so I'm sportin' the cardi until it gets warmer.
Please bear with the self photos, I've promised Jenny better ones but it will have to be once Tasha and JuneBug get home from school, O-man's photography skills leave much to be desired!

This pattern hasn't been released yet, but Jenny has some other darling ones, and based on the ease and details in this pattern, I'm sure her others are just as great.  You can get them on etsy or at You Can Make This.  I should also mention, I had everything on hand to make this so I got to do a bit more stashbusting too!

I said patterns earlier, plural.... well, I recently purchased a few of Ashley's patterns from Lil Blue Boo.  I have wanted to for quite a while now and I must say, I'm wishing I had purchased them sooner.  I've already made a few Sienna dresses for the girls and have lots of pieces cut for more.  I will get some pictures of the girls in them over the weekend.  The Sienna pattern actually only goes to a size 6, so I had to make some adjustments for my tall girls, but more on that later.

These ladies are both so talented, maybe someday I'll join the ranks of "designer" and have patterns of my own... anything in particular you want to see?

Peace be with you,
Related Posts Plugin for WordPress, Blogger...