Showing posts with label Wardrobe Challenge. Show all posts

1.05.2012

Pinterest Inspired Re-Fashion 1

I remember a conversation in college with a sorority sister one day.  We were talking about how we both woke up with a sore throat and really didn't feel well.  I'd gone to class practically in pajamas that day, she was all fancied up...When I asked her why, she told me she always felt better both mentally and physically when she wore nice clothes.  That has always stuck with me and I frequently think of it when I'm not feeling great and stay in my jammies all day.

But since the gray winter skies tend to get me down, I'm going to try to fight against them this year by wearing cute clothes most days and participate in What I Wore Wednesday over at the Pleated Poppy.  AND since I'm on a spending budget of $0, I'm going to remake the clothes I already have (with occasional thrift store finds, can't rule that out even with a budget of $0, it's bound to happen).

I give you my first Pinterest Inspired Re-Fashion:

Bear in mind, I was working with what I had so I changed up the colors a bit and added boots... since I can't go outside in stocking feet!!!!!

 I started with a black sweater from the bottom of my closet.  It had actually been on the wire shelf so long I tossed it into the dryer on fluff to get the shelf's impressions out of it!
 After a little trial and error, I settled on applying the lace with liquid stitch, the kind that you iron in place... because I had it on hand.  I did stitch down the ends and may go back and hand stitch now that it is in the right spot.  I also added buttons down the middle (don't show up in pic) that all coordinate but are different just for fun.  I left off the bows ontop of the lace, that was a little too much for me.

I crocheted a quick infinity scarf, took a few inches off a hand-me-down skirt and since it had red in it, added red tights and boots.
Oh, and red glasses!

I've pinned quite a few more outfits I plan to refashion, I hope you'll come back and check them out!
Peace be with you,

11.30.2011

What I Made to Wear Wednesday: High Waisted Skirt

Pinterest is an addiction, if you haven't tried it... I highly recommend it!  Most of the time, I like to see what other people have pinned, particularly when it comes to fashion.  My version of fashion is to find what others like or is in style and make my own, usually by upcycling.  Some things are just meant to be, I pinned these skirts and a few days later my friend Sandy gave me a few skirts she wasn't going to wear any more...


Source: modcloth.com via Emily on Pinterest
Source: polyvore.com via Emily on Pinterest

Here's my version and how I made it:
 I started with a long skirt and a pair of scissors.

 My first cut was about an inch and a half longer than I wanted the final length.  My second cut was for double the width +1 inch for the width I wanted the waist band.  The bottom portion is in my scrap bin for now.

For the waist band, I folded it in half, ironed and seamed the whole things with an angle on the end (left an opening for turning).

 When I laid it out, this is what I planned on having the finished skirt look like.  However, I forgot about the fact that the zipper had to stay in the back (based on the placement of the darts, I wasn't interested in totally starting over, if I was, I would have cut differently).

 So, after a bit of trial and error, I settled on this.  This is the back of the skirt with the zipper, I never actually finished the one end.  Sorry I didn't take pictures, but I sewed the waist band on and top stitched.  I then wrapped the "tie" around and wore it pinned in place.  My plan had been to use a funky pin but while getting ready to go out, realized I didn't have one!  Guess that will have to go on my to make list.

Sorry Sandy, you aren't getting your skirt back!

If you like what you see,
I’d love for you to follow me!

Peace be with you,
 

I'll be linking up to some of these parties, stop by and check out the talent!

11.13.2011

Jumping on the Band Wagon... or Leader of the Pack?

I know we've all seen the simplicity of sweater sleeves turned into leg warmers lately.  The other day when I was wasting time on Pinterest, I saw a few more cute ones and thought, I need to get some sweaters to do this with.   A little while later, it dawned on me... I have a box labeled "Sweater Parts"...

Now, where did I put that and what is in it?

Turns out:
About 10 sweater sleeves!  Plus, I actually serged all the ends before packing them away... I should have labeled the box "Leg Warmers" since I didn't need to do anything to them... well, some the thread is really obvious (ie, the red ones there) so I need to fold that under and hem it.

And now a random picture my son says has to be next:
I've been busy making lots of hats for the etsy shop, O-man said I had to put this picture of he and "Georgia" in... "Right der, Ommy"... between his coughing and stuffy nose...

So, while I was going to jump on the band wagon and make myself some leg warmers, I should have put these on instead of putting them in the box and I would have been leading the pack!
Guess it's a good thing, since at this rate, I'm never going to get to crocheting or knitting the chunky, funky pattern I drew up... well, maybe by next July!

Peace be with you,
 

I'll be linking up to some of these parties, stop by and check out the talent!

11.02.2011

What I Made to Wear Wednesday: Sweatshirt Refashion

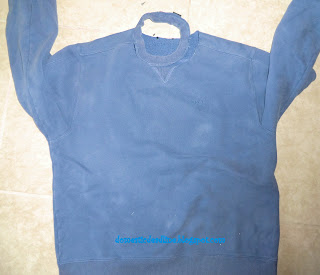
So, this morning after the girls left for school, I was sitting on the couch being a total bum... and eating their Halloween candy for breakfast... when I finally decided I needed to get up and do something productive.  I have seen some cute sweatshirt refashions lately and had already started one that had stalled out.  Still on the couch, I looked for some inspiration on pinterest.  Now I have a ton of inspirational sweatshirt refashions, but one would work with the sweatshirt I'd already started, so I went with that... I figured it was better to finish up an existing project than start a whole new one!

Here is a picture of what inspired me and here is what my version ended up looking like:
I'll give you a brief run down of what I did.  Warning: this took an entire spool of thread!!!!

First, start with an old sweatshirt.  I have no idea where this sweatshirt came from, it's navy (hard to tell in some of the pictures) and really pretty worn nicely broken in.  Cut off the collar and up through the center of the sweatshirt:
I rounded out the bottom edges and along the collar.
If you need to take the arms and sides in, do this now.  The picture below shows one sleeve that I took in over top of the sleeve I didn't take in (don't worry, it's not lopsided, I took the other side in after the picture).  I tried it on inside out and decided how much to take in.
The final step is going to use all that thread up.  Fill your bobbin to the max!  I didn't take pictures of the process because I had to run to the store in the middle of it to get more thread and I forgot!  Using a zig zag stitch  close to the edge and on the smallest stitch length, pull the fabric and go all the way around the entire edge and sleeve to give it a ruffled edge.  Then I did three rows of straight stitches separated by the width of my presser foot, again, all the way around and on the sleeves.
I'd actually planned on doing 5 rows of stitching and putting on buttons... but O-man was over it... and frankly... so was I!  I might still do the buttons later.  Lets put it this way, you don't get to see my face in this picture because I'm not too happy with the child hanging on my leg...
Quite comfy and a lot nicer to wear out of the house than the pajamas I wore until noon!

Peace be with you,
 

I'll be linking up to some of these parties, stop by and check out the talent!

10.12.2011

What I Made to Wear Wednesday - T-Shirt Skirt

I actually made this a few weeks ago and have been wearing it lots but keep thinking, "oh, I'll take a picture next time I wear it," which of course never happened... until today!  I was finally folding the enormous pile of clothes IronFish washed for me over the past several weeks and decided I'd change into it and picture it.

Truth be told, I really wanted to wait to perfect the design, make another one, that kind of thing.  It is so comfortable and I really love wearing it and I'm hoping to make some and add them to my etsy shop, in both kids and mom's sizes.  But here it is in it's original form, while I busily crochet more angry bird hats than I ever thought I would.  Perfecting the pattern will have to wait a bit.
It's kinda crazy colored, but I usually just wear it with whatever t-shirt I feel like it that day.  Since I was just playing with the design at the time, I used t-shirts that were already cut up instead of cutting into new shirts or jersey material.  I'm fairly pleased with it except I cut the back side wrong, it was supposed to wrap all the way around, and I made it as a reverse of the front. They yoga waist makes it super comfy.
What do you think? 

Peace be with you,
 
I'll be linking up to some of these parties, stop by and check out the talent!

8.24.2011

WIMTWW: Tied Shirt Dress

Earlier this month I did a guest spot for Jenny over at Seamingly Smitten for Sew Chic Upcycle Week.  Here's the low down in case you missed it!
Hi, I'm Emily from Domestic Deadline and I'm so excited to be here for Sew Chic Upcycle Week.  I love upcycling clothes and have been trying to make myself something new each week (my version of pampering!).  A while back I made this dress:
I really like it; it's super comfy and always gets lots of compliments (makes me like it even more!).  So I've been stock piling over sized men's dress shirts but have not yet been as inspired by any of them make another one.  However, the other day I saw this tutorial and knew one of those shirts had a future...
 

Here's what you'll need:
A very large mens dress shirt
A coordinating t-shirt
Basic sewing supplies

Here is what I started with:

 Cut your t-shirt as shown below.  You can cut off a portion of a t-shirt and add arm holes, I was working with a shirt that had some bleach spots and was looking for the best section of the shirt.

You will need about 10 inches from the top of the shirt (I did 9.5 inches, but will do more like 12 next time, but I was working around the bleach spots).  In the center of the front, cut a 3 inch slit.

This next step is optional since you are working with a knit but I prefer finished edges instead of raw edges.  I serged (you could zig zag or just skip) all my edges, then folded them in and top stitched.  

Fold down and pin about an 1 1/4 inches on both the front sections and the back.  Stitch close to the raw edge, resulting in a 1 inch pocket.   Set this shirt aside for a bit.

Time to move on to your button down shirt.  We're going to cut it similar to the t-shirt; cut off the arms and straight across as high up as possible.  This picture shows the back side; this was a pretty nice shirt, so the top of the back had two layers, I cut just below those two layers.  This will become the skirt of your dress.
Next, we need to give this a nice A-line shape, normally I'd use my bias ruler but my 3 year old seems to have hidden it on me... again...  Sew the sides together, either serge or zig zag your raw edges.

Sew the buttons closed (or risk previously mentioned 3 year old unbuttoning your skirt when you aren't paying attention... yes, lesson learned on another dress...)  After sewing, your dress shirt should look like this:

Next, we're going to sew the two shirts together, I pinned my side seams together and matched up the centers on the front and back.  When sewing, stretch the t-shirt to be the same width as the dress shirt.

Your dress should now look similar to this:

Now it's time to top stitch.  This will be the difference between "Did you make that?" and "You MADE that?"  It's a simple step that is well worth the time.

Finally, we need to make a tie.  From the remainder of the dress shirt, piece together a strip of fabric approximately 5 inches wide by 5 feet long.  I used the double layer from the top back of my shirt and the sleeves.  Fold in half, right sides together and sew.

We're going to angle the ends of the tie.  I sewed one end on an angle before turning.

Turn your tie right side out... yes, that is a tension rod... I took it away from my son... not sure where he got it from but I'd be willing to trade for my bias ruler!  Once your tie is turned, iron it flat and iron your open end with a matching angle.  Top stitch all the way around your tie.

Feed your tie through the top pocket and you're good to go!

While I was making this I thought of several different options... how about a solid dress shirt with a fun printed t-shirt, or add a band of coordinating fabric at the end and use that fabric for the tie.  Or how about using an actual tie for the tie:

  Thanks so much for having me Jenny.  Stop by and say hi!  I'd love to see what you're upcycling!

Peace be with you,
 

I'll be linking up to some of these parties, stop by and check out the talent!
Related Posts Plugin for WordPress, Blogger...