Showing posts with label Kids Crafts. Show all posts

8.19.2011

Sewing for a Car Trip

Today we are heading up to New Hampshire for the Timberman race.  This will be IronFish's third time competing in this event consisting of a 1.2 mile swim, 56 mile bike ride and 13.1 run... yes, I think he is crazy but he's been doing this for a few years now.

So for the past few years, this has become our family vacation... it's a good thing New Hampshire is beautiful!  We have explored the area a bit each time and get to spend some time with IronFish's cousin and her husband who live near by.  I'm sure I'll share some fun pictures next week when we get back.

But, a trip to New Hampshire is a good 6 hours in the car with three kids, not as far as Ohio and luckily with another driver, but still a long car ride for kids.  A few weeks ago we were in a store and the kids saw neck pillows, and of course asked for them.  Light bulb!

I can make that!  So I did!  JuneBug and I selected flannel for each of the pillows and cut them into a U shape.  I really just eyeballed what I thought would be the right size.  I sewed and JuneBug stuffed.

I guess they like them, they have been using them even for a quick run to the grocery store!

Peace be with you,
 

I'll be linking up to some of these parties, stop by and check out the talent!

7.26.2011

Kid's Craft: Duct Tape Belt Tutorial

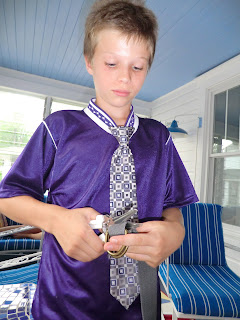
While on vacation, one of my "spares" was having fun making all kinds of duct tape projects, particularly duct tape belts.  Here he is sporting his purple ensemble:
Here's his tutorial:
Step 1: New D-rings cost more than $1, so pick up $1 belts with D-rings at the thrift store.  Cut off the old belt.
Step 2:  Cover D-ring in duct tape, both of them, all the way around.
Step 3: Using the old belt as a guide, cut two strips of duct tape the same length.  Stick them together, this is best done with two people, which is why I don't have a picture of this part!
Step 4:  Trim edges in case the edges don't match up exactly or it needs to be a bit narrower to match the width of the original belt.
Step 5:  Reinforce the end with an extra layer of duct tape in the same color or pattern as the belt.
Step 6:  Still with the same color duct tape, make a tab for the D-rings.  Tape it back onto the belt.
 Step 7:  Reinforce the opposite end with a contrasting piece of duct tape.
Step 8:  Put it on and show off your "jiggly" new belt (his word for awesome that week)!

Below is an amazing backpack he also made out of duct tape, only the straps aren't duct tape!  He uses it to hold his growing supply of fun colored duct tape.

Peace be with you,
 

I'll be linking up to some of these parties, stop by and check out the talent!

7.19.2011

Kid's Craft: Upcycled Back Packs

Several weeks ago I got a few of these bags for free:
So I set my two girls and a spare up with lots of scraps and glue sticks.
Using the glue sticks, they covered their bags with scraps any way they wanted.
Once the bag was to their liking, they passed it off to me and selected a thread color.
I zig zagged over the edges (which I must admit wasn't too easy down near the bottom of the bag).
The girls love their personalized bags.  Since they are super light weight they have come in handy for day trips carrying their water bottles and other little things they want to bring along.

Peace be with you,
 

I'll be linking up to some of these parties, stop by and check out the talent!

7.05.2011

Kid's Craft: Fireworks for the Fourth!

JuneBug made me some "flowers" out of popsicle sticks.  We decided they were the perfect addition to our summer decorations since they are reminiscent of fireworks.
She wrote her own tutorial and I thought she'd taken pictures every step of the way.  This is what I got:
Supplies: paint, brushes, popsicle sticks (Mom edited: glue, cup of water if using kids water colors, paper to protect table)

Step 1:  Paint popsicle sticks (Mom edited: let dry and paint reverse)
Step 2:  Glue 7 sticks together
 So... there you have it... my 9-year-old's first tutorial...
Peace be with you,
 

I'll  She'll be linking up to some of these parties, stop by and check out the talent!

6.13.2011

Kid's Corner: Hot Dog Cupcakes

O-man's last day of school ended with a Hot Dog Picnic.  His teacher (my neighbor) asked me to make cupcakes, knowing I wouldn't just buy something.  Of course I had to make something to go with the theme!
These were actually so easy to make and the kids did a lot of the work.  Here's what you'll need:
Yummy cupcakes frosted and sprinkled, large marshmallows, caramels, brown food coloring, water, yellow frosting (I used gel in a tube... next time I will use regular frosting).

First, cut your caramels and marshmallows in half using kitchen scissors.  Snip the center of each half of the marshmallow making a place for the hot dog to go.  Have the kids roll the caramel halves turning them into the hot dog shape.
Now it's time for a little finger painting!  In a small bowl of water add brown food coloring until the water is about the same color as the caramels.  Have the kids dip their finger into the dyed water and finger paint the marshmallow halves on the rounded side (not the cut side).
Don't forget to paint the ends of your buns.  They actually went right up to the hot dog, some white showed, but this made it look more real in my opinion.
Place on top of your cupcakes and pipe a squiggly line of yellow "mustard" frosting.  I used a tube of yellow gel icing because I was too lazy to mix up the small amount of frosting I needed... mistake!  Maybe in the winter it would have been fine, but the gel had melted by the time the party started and didn't look nearly as cute.  But they still got rave reviews and tasted really yummy!
I got quite the kick out of O-man and his friends at the picnic, one little guy wouldn't eat the bun of a regular hot dog... or the marshmallow version!  I'm pretty sure he was expecting the caramel to actually be meat too!

Peace be with you,

I'll be linking up to several of these parties:

6.07.2011

Kids Corner - 100 Day Challenge

If you have elementary school aged children you can probably sing the entire theme song to Phineas and Ferb... "there's a 104 days of summer vacation and school comes along just to end it..."  Here in the north east, we still have school for a few more days and there is only 77 days of summer vacation. 

With summer vacation nearing and our chore charts getting looked at less each day, I decided we needed a little motivation, enter the 100 Day Challenge!  My girls have been doing fairly well with their chores on the charts I made a while back.  Even though they earn an allowance each week of $5 ($2 goes into savings, $2 goes into their wallet for their spending and $1 goes to church), keeping them motivated has gotten a little hard.  Which means I'm yelling about the things that need to be done and they aren't helping each other get their chores done.

What is the 100 Day Challenge?  Well, for the next 100 days, the girls have to do their chores in order to earn a sticker on the chart.  One sticker, which means, they have to work together to make sure both of their chore lists are done without fighting about it.  They also have to work with their brother and teach him to do some of the picking up, making it fun.  And finally, the main floor of the house has to be mom approved before we leave the house or they go to bed!

I was impressed when the girls decided the first step to getting their brother to help, was to teach him to respect that they've done the work and he shouldn't dump out all the toys they just picked up.  JuneBug had him follow her around while she picked up the toys and showed him that she was working hard.

What does 100 stickers get them?  Instead of their normal allowance they will be working towards earning something they really want.  For Tasha, it's a DS system.  For O-man, it's a monkey Pillow Pet (he's the only one without one).  JuneBug is still thinking of what she wants to earn.

Vacations don't mean a break in the challenge.  Whenever we are away from home and get out of our routines, it takes us weeks to get back on track.  This year when we are on vacation, the same chores will have to be done, we'll just take the chart with us.

Here is our chart:
We are only two days into it, so we've got a long way to go.  I drew the blocks and the girls did the rest.  They are very proud of it.  Now I just have to find a good place to hang it where we will constantly see it.

Peace be with you,

4.18.2011

Easter Decorations

Easter is less than a week away.  The kids are on Spring Break here and this year we will be home.   When the girls got home from school on Friday, we decided to make a few decorations, stashbusting style!  Nothing we did is new to blogland, most of what we did is copied from something we've seen but we had fun and I promised the girls I would show it off.  (I'd give credit, but many people out there have their own versions, it would take forever to go back and find all the sites I've seen similar things on!)

Here's what we used that was all on hand:  Mini and regular sized Styrofoam eggs, fabric strips, glass jars, old book pages, yarn, mod podge and glass candle holders.  I did buy blue spray paint, but I needed it to finish two other projects, so the $2.50 the mini can cost was well worth it.  Some of the supplies I had bought shortly before stashbusting began, and of course didn't get to the project until now, but it's out of my stash!

Take a peek:
The girls had a lot of fun making the book page eggs, we have about 20 of them!  To make it easier on them, I had them wet the paper and then paint mod podge over top.  I did smooth them a bit before they were dried.  I should go back and put another coat or two on them, but I probably will just find another project to do instead!
Sorry, the egg in the middle was something I picked up on clearance a few years ago, but it would be really easy to make if it hadn't been about 50cents!  I just liked the way it looks with the mini egg tree and the rolled rosette tree.  What doesn't show up in the picture is that we covered the tree with a course yarn about the same color as the nest on the large egg.  I did it that way to coordinate the three pieces together

Peace be with you,

1.31.2011

Paper Heart Flowers

Despite my intentions of actually using Valentine's decorations around the house this year (my girls love to decorate for the holidays), the wreath is the only thing that made it up.  Friday I went down and pulled out the container marked Valentine's Day, excited to finally be getting it out, I don't think I ever got it out last year.  Well, I sure was in for a surprise when I opened it...... it contained two hand towels, a roll of ribbon and some plastic hearts that must have broken off something else.  Surprisingly disappointing.

Good thing there are lots of fun Valentine's Day ideas floating around blog land.  One that stood out to me was a paper arrangement found here by Haley and her mom.  I really loved how Haley attached her paper flowers to sticks but there is a good 2 feet of snow preventing me from getting to a tree to steal it's branches, so I went with the skewers since I had them on hand. 

I also don't have a Cricut, but I do have scrapbook punches and slave labor children.  So I armed them with a stack of scrapbook paper, some stickers and glue sticks and set them free!  This ended up being a neighborhood project with several giggling girls at my dining room table.  When they were done I took the stack of "flowers" and hot glued them to long skewers.  I arranged them in a metal pail stuffed with newspaper.  The pointy end of the skewers made it easy to push them in to whatever height I liked best.  Here's the final result
Here's a close up

Some are a little funny looking, but they are bright and cheery, full of hearts and love, so I love them!  Now I get to clean up the living room so we can proudly display our Valentine's Day Bouquet... (ugg, this will probably take longer than it took to make the flowers...)
Peace be with you,
Related Posts Plugin for WordPress, Blogger...