This post has been updated and moved to:
DomesticDeadline.com
Follow the link above to check it out!

Showing posts with label craft organization. Show all posts
Showing posts with label craft organization. Show all posts


6.06.2011
Mission Organization Monday - Ah-Ha Moment
You ever have one of those spaces you can't figure out how to keep organized and then when you realize the solution, it seems so simple? This is one of those. I stocked up on serger thread when I realized Walmart's price was only $1.94 a spool (I still wonder if that is a mistake!). Since I need 4 spools of each color, I have at least 20 spools, probably more. Now, the back-ups of black and white can be tucked away until I run out of the spools I'm currently using, but I have several colors now and want them to be easily accessible.
A few months ago I picked up this little shelf thingy for only $3.50 at the thrift store.
 I didn't know what I was going to do with it, but it seemed like something that I could find a use for eventually, especially at that price. It moved around in my stash for a while. At one point I thought my button bottles would work great on it, but they are slightly too tall, so it went back into the pile.
Then one night when I couldn't sleep, it occurred to me that it was the perfect size for my serger thread spools! All it needed was a brighter color... I had to paint the thread rack while I was at it...
 It fits perfect under my cabinet, and it freed up the space on the counter, making it easier to sew. I love when the solution is right in front of me!
Peace be with you,
A few months ago I picked up this little shelf thingy for only $3.50 at the thrift store.

Then one night when I couldn't sleep, it occurred to me that it was the perfect size for my serger thread spools! All it needed was a brighter color... I had to paint the thread rack while I was at it...

Peace be with you,
4.26.2011
Button for your thought?
I have a lot of buttons. A LOT. Some came from friends who know I like to sew and more came from a large tin that was my grandmother's. I consolidated all the random containers into one large one however digging through that bin became a bit daunting. I found the solution in a bottle!
I went through a bit of a Starbucks frapachino binge and saved all the bottles. The kids helped me sort them in rainbow colors. I spray painted the lids in a robins egg blue to coordinate with my craft space. Now they look pretty enough to leave out on display. It is much easier to find ones that work with my project this way too!
 Too bad this is only some of them!
I'll be linking up to some of these parties this week, like Orgjunkie
I went through a bit of a Starbucks frapachino binge and saved all the bottles. The kids helped me sort them in rainbow colors. I spray painted the lids in a robins egg blue to coordinate with my craft space. Now they look pretty enough to leave out on display. It is much easier to find ones that work with my project this way too!

I'll be linking up to some of these parties this week, like Orgjunkie
3.04.2011
Craft Organization... a tiny bit more
I started tearing things off my work space with the goal of getting it back into shape. I got sidetracked and now the pile on the floor is bigger. An idea popped in my head and the next thing I knew, I was working on it and not organizing.
So this is all I managed to get done...


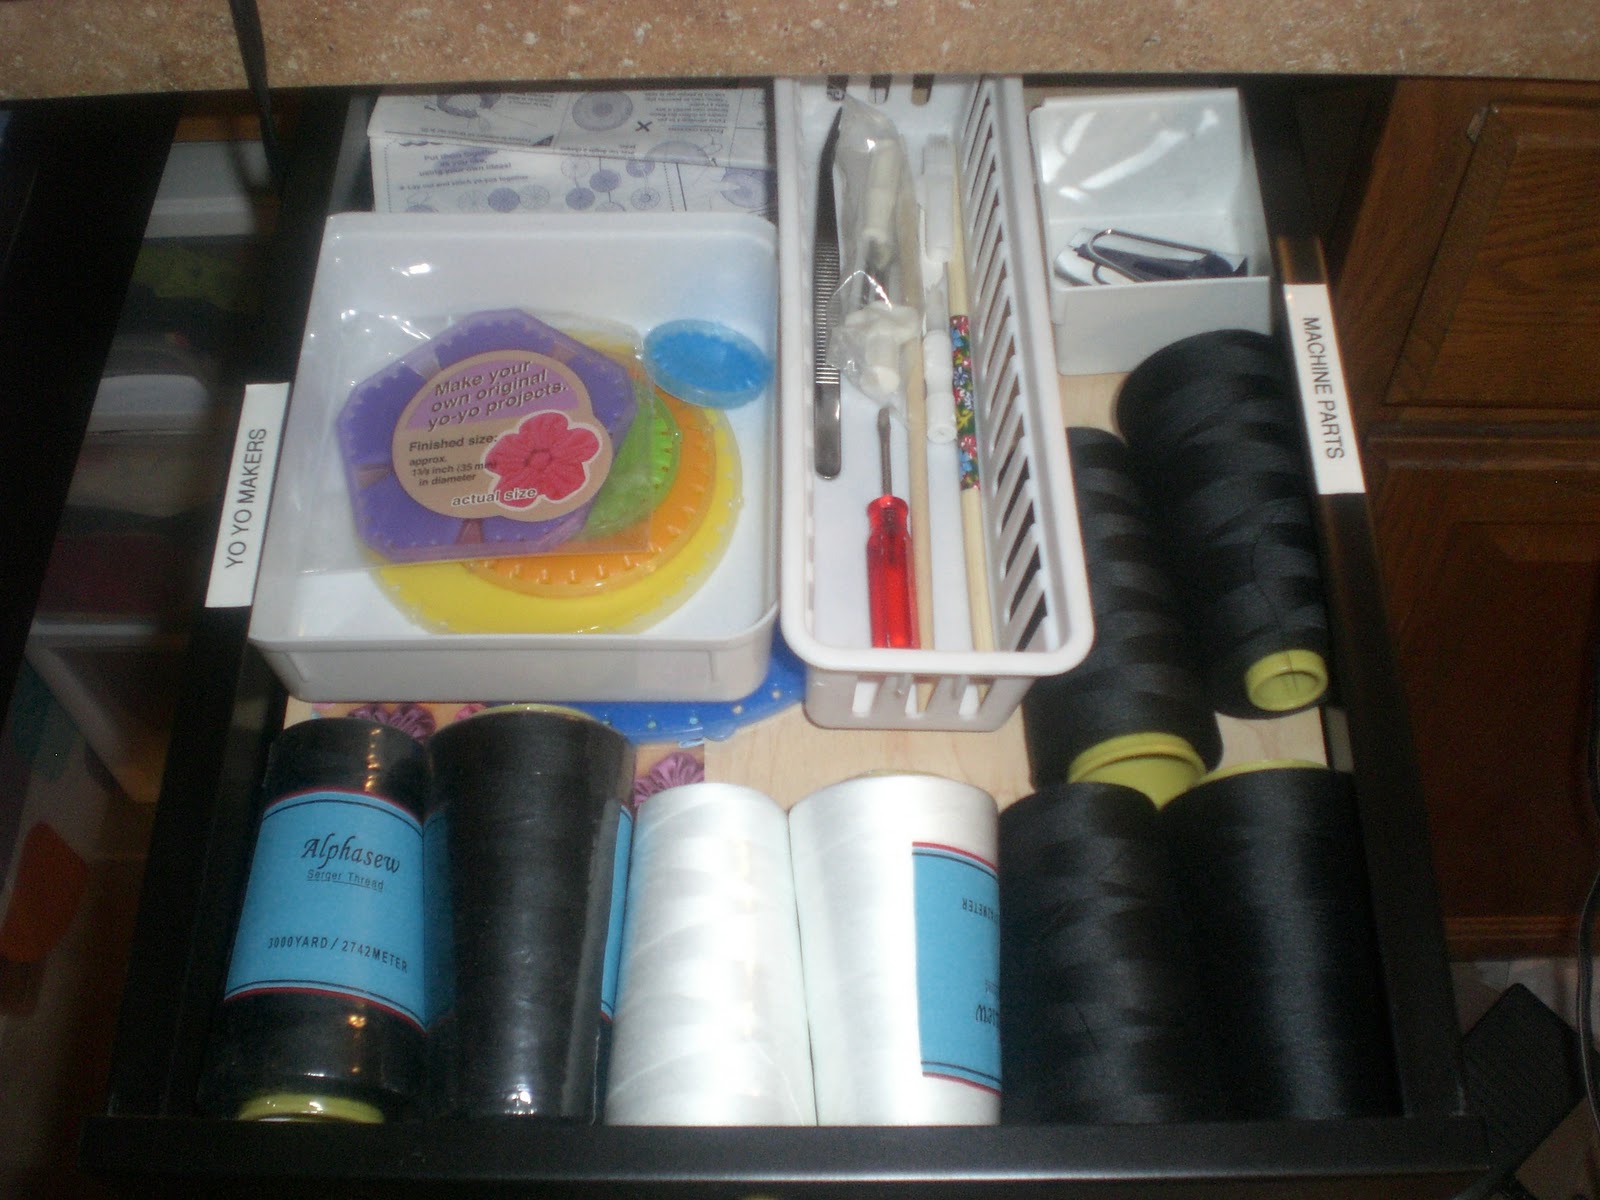
 I put a few of the things that were on the shelves in my new drawers. This stuff is so much easier to reach now when I need it, which so far has made me put it right back (my biggest problem in my craft space...)
Peace be with you,

So this is all I managed to get done...


Peace be with you,
3.02.2011
Ribbon Organization
I'm still waiting for a 12 step program for craft addicts, but in the mean time, I am trying to trudge along with organizing and pretty-ing up my craft space. A while back I got a great shelf meant to hold all my ribbon... well, it held a good amount, but definitely not all of it... bummer.
So, I put the ribbons on in rainbow order and stacked additional ribbons inside and out of a box on top of the shelf. It continued to bother me.
Plus, I was trying so hard to put all the ribbon in rainbow order, I forgot that half of the ribbon I was putting on there was little spools from the dollar bin. Every time I went to use one, I'd use all 18 or 24 inches up and have a cardboard roll empty in the middle of the rack.
I set out to solve the problem and I'm quite pleased with my current solution. First, I removed anything that has wire trim since it really isn't meant to be used on clothes, plus it is mostly holiday related. That is all now packed away with the holiday it belongs with. Then I only put spools of ribbon that were four feet or longer, this way when I use a small amount, I won't be left with an empty spool.
Now those cardboard spools take up a lot of space, so the short ribbons came off. I thought about just putting all the small pieces in a jar or something like that, but it would bother me too much that they were all mingling together (I have strange OCD to things like that). Recently, I saw someone who used the old rounded clothes pins (the ones without the spring, just the rounded top) but I couldn't find them and I really was hoping to keep this a low budget project.
On a quick trip to my local dollar store the solution came to me... foam hair rollers!!! After a few evenings of rolling up the ribbon pieces here is my final result:
 I was trying really hard not to get the clutter around the space in the picture! I picked up the little blue buckets for $2 each, I just love the color, plus it pulls from the wall color in my living room and adjacent hallway.
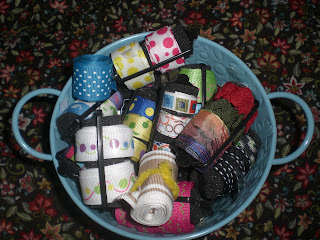 Some of the curlers I put two ribbons on, some three. There are a few random ones that were wide but short in length (usually saved from something else instead of the trash) wrapped with a piece of pipe cleaner. There were a few that I had several short pieces of the same ribbon, they filled up a curler by themselves.
Check that off as one more space that looks pretty and organized in my craft space!
Peace be with you,
So, I put the ribbons on in rainbow order and stacked additional ribbons inside and out of a box on top of the shelf. It continued to bother me.
Plus, I was trying so hard to put all the ribbon in rainbow order, I forgot that half of the ribbon I was putting on there was little spools from the dollar bin. Every time I went to use one, I'd use all 18 or 24 inches up and have a cardboard roll empty in the middle of the rack.
I set out to solve the problem and I'm quite pleased with my current solution. First, I removed anything that has wire trim since it really isn't meant to be used on clothes, plus it is mostly holiday related. That is all now packed away with the holiday it belongs with. Then I only put spools of ribbon that were four feet or longer, this way when I use a small amount, I won't be left with an empty spool.
Now those cardboard spools take up a lot of space, so the short ribbons came off. I thought about just putting all the small pieces in a jar or something like that, but it would bother me too much that they were all mingling together (I have strange OCD to things like that). Recently, I saw someone who used the old rounded clothes pins (the ones without the spring, just the rounded top) but I couldn't find them and I really was hoping to keep this a low budget project.
On a quick trip to my local dollar store the solution came to me... foam hair rollers!!! After a few evenings of rolling up the ribbon pieces here is my final result:


Check that off as one more space that looks pretty and organized in my craft space!
Peace be with you,
3.01.2011
Pretty-ing up the Craft Space
I've been inspired but some of the amazing craft spaces I've seen around blog land. I was feeling pretty good about mine (despite the mess that constantly ends up on the open floor space) but decided it needed to be Pretty-ed up a bit. This is a work in progress, the ideas are flowing but the time is not.
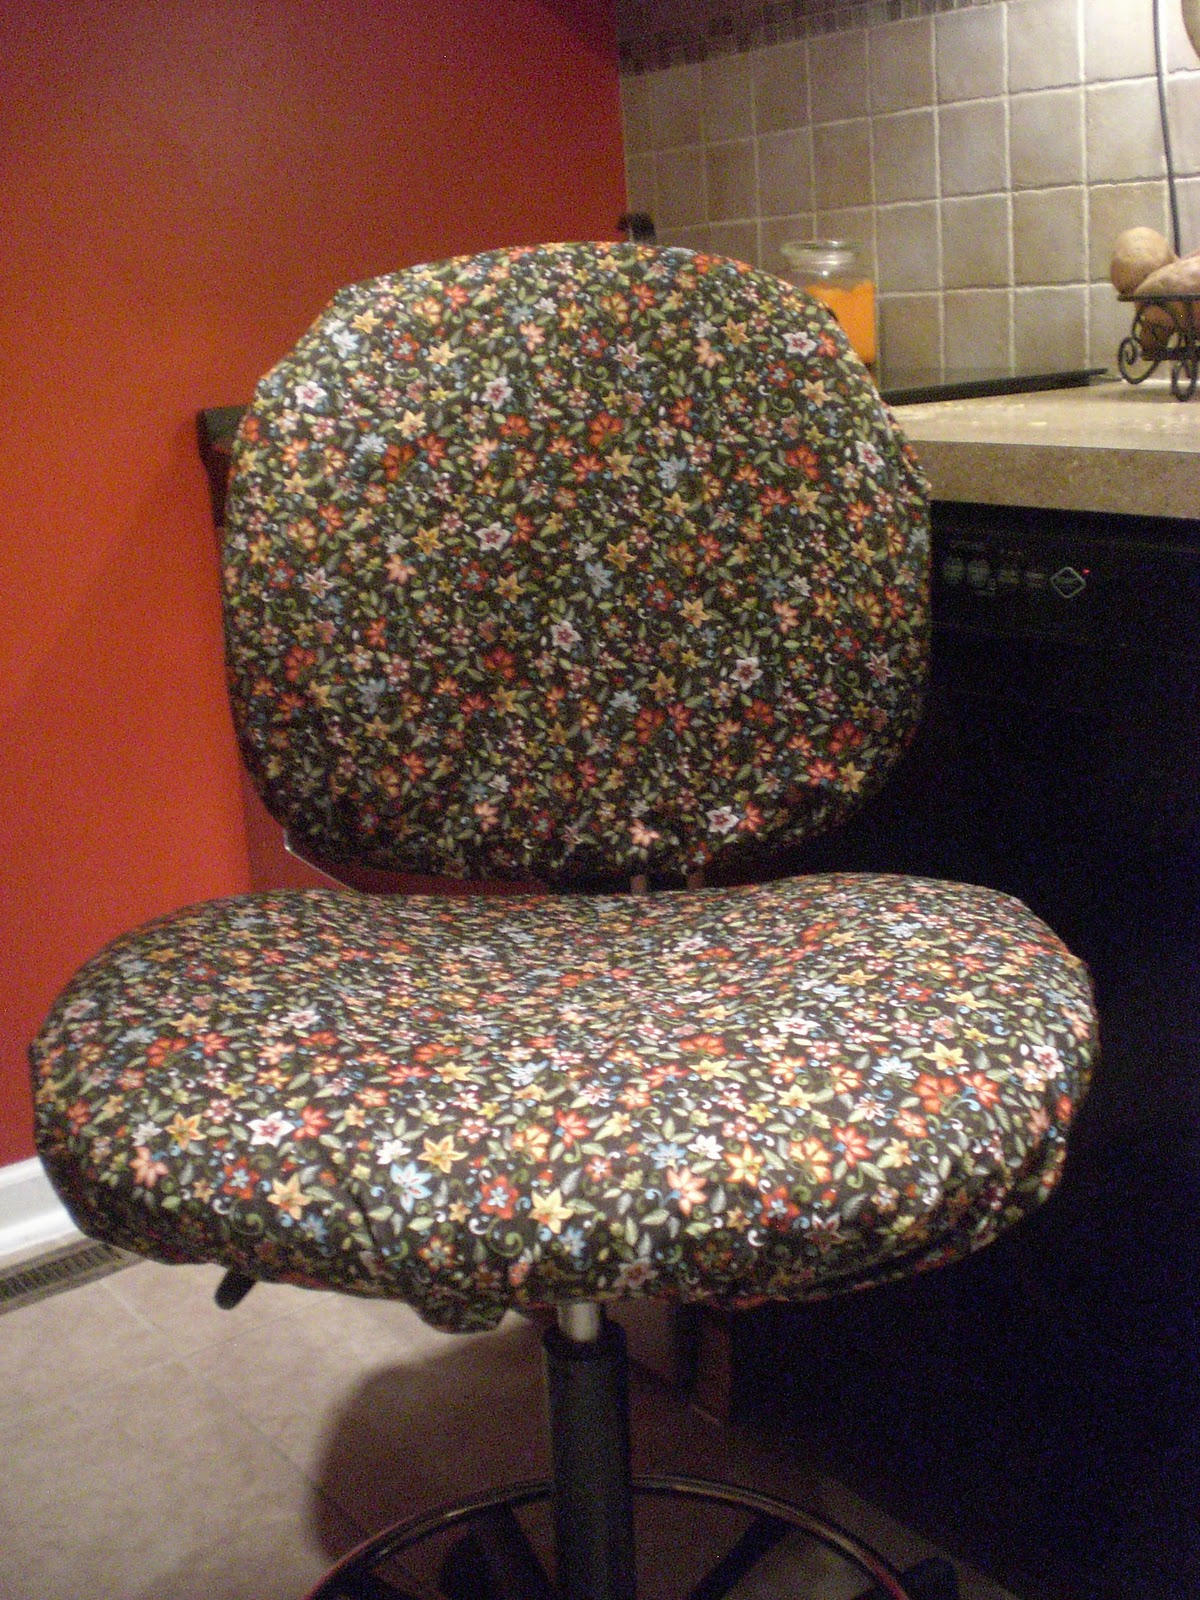
I did manage to finish covering my boring counter height office chair. Initially, I was looking for the perfect material to coordinate the colors on my first floor... to make the craft space look more intentional and hopefully pretty when not in use. When I was making my machine covers I realized I had the perfect fabric all along (love making a dent in the stash).
From the front:
 On the back, I just had to cover the tube where the back adjusts.
 Overall I'm pretty pleased with it. It has ribbon to cinch it and tie it closed, easy to remove and wash
 if when necessary. I'm going to blame my mother for the mistake I made on the chair back. I have a vivid childhood memory of my parents, sister and I all working on re-upholstering the living room furniture. "The family that re-upholsters together, stays together," (typical Sister-Baby remark). As I was working on the back, I forgot I was making a slip cover, not re-upholstering. I kept looking at where I was putting the seams as if they needed to line up to keep the look neat. I could have saved myself a lot of time and hassle if I'd just looked at it as a slip cover in the beginning. Oh, well, it is still so much nicer looking than office gray.
Should I cover that little knob on the back? Any suggestions?
Peace be with you,
I did manage to finish covering my boring counter height office chair. Initially, I was looking for the perfect material to coordinate the colors on my first floor... to make the craft space look more intentional and hopefully pretty when not in use. When I was making my machine covers I realized I had the perfect fabric all along (love making a dent in the stash).
From the front:

Should I cover that little knob on the back? Any suggestions?
Peace be with you,
2.24.2011
All in a day's work
I finally got something done in my craft area that I've been wanting for at least seven years...
 Not insanely beautiful, just a ceiling fan but it has a light, I haven't had a ceiling light on this side of the room ever. It was in my daughters' room but it was way too large for their little room, it couldn't be turned on more than low or it turned into a wind tunnel. They now have a simple white, appropriately sized fan. I get enough light that I might actually be able to work in there after dinner!
See, light!
 Now I have a lovely layer of dust to deal with tomorrow...
 But, Ironfish gets to fix the hole in the ceiling this weekend!
 I guess I should mention, the electrician did the work. I got to deal with a sick child while I attempted to better tame my ribbon collection.
Peace be with you,

See, light!


Peace be with you,
2.14.2011
Craft Organization... improvements!
When we "renovated" our kitchen, I really wanted more drawers in my craft space (the other side of my kitchen), however, the cabinets were hand-me downs and our budget was incredibly limited. Some day I will do a post on how we did a 22 foot by 11 foot kitchen for only $4500, including appliances and doing the flooring two times. I considered purchasing two drawer units but that would have meant re-routing two electrical outlets and a third of our budget had already been spent on electrical work so I went for a less expensive option. Almost four years later and I'm still trying to incorporate drawers, guess I should have spent the money back then.
I searched off and on for many months for "add-on drawers." A few months back I found and ordered the ones pictured on the left from Amazon, although they are actually black, not gray. I got five kits, shipping seemed pricy to me, but ultimately I spent about $85 to add four drawers to my craft space and one to my kitchen. Yesterday, IronFish was able to start installing them for me! {Please note: I have no fear in using tools and doing this myself when my girls were young, I could have... O-man is a whole 'nother story!!!}
Since we were adding them to the underside of our laminate counter tops, IronFish cut strips of wood that we adhered with construction adhesive and screws to account for the lip at the front of the counter top. Don't mind the visible mess on top, but here is the before:
 I have an abundance of "craft crap" so don't think for a second that space had been empty! That tension rod and material on top is actually a curtain I made to attempt to hide the stash below... I would have taken pictures of the process, but as soon as the camera came out IronFish said he wouldn't continue if I was going to take pictures the whole time. Installation prevailed so you will have to settle for my before and after shots, except for this one with the mess and the assembled drawer (they come in a flat box):
 Here they are installed:
 And opened... just waiting to be filled!
 The bottoms of the drawers are not really sturdy. I read the product reviews online and some people suggested replacing it with plywood. I may do that, but as of now, most of what I plan to put in them is fairly light weight. It definitely gives me extra space and I'm already thrilled with them but IronFish has warned me if I ever purchase them again, I will find myself stuffed inside of them (the directions were beyond horrible!). Once we figured out the first one the second one was a breeze to put together but just to spite me he continued to grumble (he'll deny that it was to spite me).
As in most of my organization projects, everything gets worse before it gets better. But we are down to only four days until the in-laws arrive; which increases my determination. I'm hopeful the other three will be finished before they arrive but our bowling league started last night. Unfortunately for my team, real bowling is nothing like wii bowling. Maybe it's all in the shoes. Do you think these babies would help me break 50?
Peace be with you,
I searched off and on for many months for "add-on drawers." A few months back I found and ordered the ones pictured on the left from Amazon, although they are actually black, not gray. I got five kits, shipping seemed pricy to me, but ultimately I spent about $85 to add four drawers to my craft space and one to my kitchen. Yesterday, IronFish was able to start installing them for me! {Please note: I have no fear in using tools and doing this myself when my girls were young, I could have... O-man is a whole 'nother story!!!}
Since we were adding them to the underside of our laminate counter tops, IronFish cut strips of wood that we adhered with construction adhesive and screws to account for the lip at the front of the counter top. Don't mind the visible mess on top, but here is the before:


As in most of my organization projects, everything gets worse before it gets better. But we are down to only four days until the in-laws arrive; which increases my determination. I'm hopeful the other three will be finished before they arrive but our bowling league started last night. Unfortunately for my team, real bowling is nothing like wii bowling. Maybe it's all in the shoes. Do you think these babies would help me break 50?
Peace be with you,
2.04.2011
Sewing Machine Sleeping Bags
O-man wanted to know what I was sewing. After several attempts to explain something I thought was pretty simple, sewing machine covers, we finally concluded they were blankets so my sewing machines could sleep at night. He walked away saying, "why didn't you just say they were sewing machine sleeping bags..." I guess I shouldn't be too surprised, this is the child who the other day said, "Mom, I really appreciate you not forgetting me," when I picked him up. He's not even officially 3 yet, what will he come up with when he gets older?!?!?!
I'm still attempting to reign in the constant clutter around my craft space, as well as making it look less cluttered when all the "drop it here because I don't know what else to do with it" from the whole family isn't actually there. You know, when it is actually clean, but still has a cluttered look, fix that problem.
Sew, (pun intended) I cut up a table cloth I had that was fraying around the edges, added some left over denim on the inside to make the covers have more structure and some fabric I love as trim and here is what I came up with:
 I have been planning this for a while, hoping if the machines were out of sight they would be out of mind to O-man, but I was looking for the right fabric, only because I want to use it in a few places to tie the space together. Turns out, I had this fabric all along, and it's one I love but was never sure what to do with it! My goal is to finish clutter control and those other projects using this fabric this weekend. I really want to get it done and just maintain it since my in-laws will be here in a few weeks... we always need all the space we can get when we have company!
I also made a trip to the thrift store for some more cable knit sweaters. Pillows for my Sister-Baby and a few ideas I have for an entry into 733's Knock it off Contest

 Peace be with you,
I'm still attempting to reign in the constant clutter around my craft space, as well as making it look less cluttered when all the "drop it here because I don't know what else to do with it" from the whole family isn't actually there. You know, when it is actually clean, but still has a cluttered look, fix that problem.
Sew, (pun intended) I cut up a table cloth I had that was fraying around the edges, added some left over denim on the inside to make the covers have more structure and some fabric I love as trim and here is what I came up with:

I also made a trip to the thrift store for some more cable knit sweaters. Pillows for my Sister-Baby and a few ideas I have for an entry into 733's Knock it off Contest
I can't pass up a challenge! Sister-Baby, here are your cable knit soon to be pillows, hope you like them! There were so many awesome cables I wanted to buy... maybe I should start taking custom orders...?

1.27.2011
"It's about time you made us chore charts, Mom!"
Yup, JuneBug actually said that when I showed her my new, nice, neat chore charts. Tasha's response was "oooohhhhh, pretty!" And O-man wanted to know where his was too! This obviously made me happy (big grin).
We've been slammed by several more inches of snow and during my insomnia last night, I looked for ideas on how I wanted to do these chore charts we've been talking about for a while. Pre O-man, we had a simple chart on the fridge listing things that needed to be done by day. This actually worked really well for us, but we thought we had it memorized and stopped printing it out (I would write the meals on it each week) and soon, not only was it forgotten about, so were the chores.
My girls are pretty helpful, but they don't like to be nagged (yeah, like anyone actually likes to be nagged by their mother...). JuneBug does very well with a schedule and a timer is something that is quite helpful for keeping Tasha on track. Now they each have their own timer (re:flylady on the awesome use of timers) and what they are supposed to do each day is written and is color coded for morning, after school and before bed.
 I know the picture is hard to see, but weekdays are on the left, weekends on the right. The red box is reminders (like taking meds, if necessary) and the green is a little reminder of how we've agreed their allowance will be divided up (savings, spending and donations).
O-man's is a little more simplified for a not quite 3-year old. I was quite pleased that he was able to tell me what each picture represented without me telling him first.
 The girls have picking up toys on their list, but the fact is, most of the toys are strewn about by O-man, and we have been working with him to be even a little part of that clean-up time.
One site I used for my inspiration was Organizing Made Fun, Becky has a great series on how to fake a clean house. Ironically, her section on cleaning 15 minutes a day, is basically how we had our old chart. While I'm still trying to do the whole flylady thing, I feel like I get a room in shape and the rest of the house falls apart. I have my very own chore chart just like the girls' now too with the goal of ultimately getting everything cleaned once a week and doing flylady's daily missions so I don't have to do major cleaning ever again.
Yes, I probably spent way, way, way toooooooo long making these chore charts up for each of us. My goal now is to motivate myself to get off the couch and work on my 52-weeks of organizing list, so I'm going to show off the few places in my house that I've gotten really organized and have stayed that way. Don't worry, it's a pretty short list:
Yep, that's it. Now you know why I have the 52-week list, only 3 spots in my house are truly functionally organized. Guess I should make the most of being snowed in...
Peace be with you,
We've been slammed by several more inches of snow and during my insomnia last night, I looked for ideas on how I wanted to do these chore charts we've been talking about for a while. Pre O-man, we had a simple chart on the fridge listing things that needed to be done by day. This actually worked really well for us, but we thought we had it memorized and stopped printing it out (I would write the meals on it each week) and soon, not only was it forgotten about, so were the chores.
My girls are pretty helpful, but they don't like to be nagged (yeah, like anyone actually likes to be nagged by their mother...). JuneBug does very well with a schedule and a timer is something that is quite helpful for keeping Tasha on track. Now they each have their own timer (re:flylady on the awesome use of timers) and what they are supposed to do each day is written and is color coded for morning, after school and before bed.

O-man's is a little more simplified for a not quite 3-year old. I was quite pleased that he was able to tell me what each picture represented without me telling him first.

One site I used for my inspiration was Organizing Made Fun, Becky has a great series on how to fake a clean house. Ironically, her section on cleaning 15 minutes a day, is basically how we had our old chart. While I'm still trying to do the whole flylady thing, I feel like I get a room in shape and the rest of the house falls apart. I have my very own chore chart just like the girls' now too with the goal of ultimately getting everything cleaned once a week and doing flylady's daily missions so I don't have to do major cleaning ever again.
Yes, I probably spent way, way, way toooooooo long making these chore charts up for each of us. My goal now is to motivate myself to get off the couch and work on my 52-weeks of organizing list, so I'm going to show off the few places in my house that I've gotten really organized and have stayed that way. Don't worry, it's a pretty short list:
 |
| Probably my prettiest organized spot with everything labeled and almost all the spice containers have matching red lids |
 |
| Inside one of the cabinets in my craft area. Yes, we had to eat a lot of Chinese take-out to get enough containers! The other ones are pencil boxes I picked up at Staples for 50cents, but obviously not enough. |
 |
| My linen closet. I think it looks great and very neat and orderly, but when I take a picture, it doesn't come across as nice, but trust me, it looks great! |
 |
| Here is a close up of the linen closet. I love my label maker, can you tell? |
Peace be with you,
1.18.2011
Craft Organization... part duex!
I'm not fond of 7-11's new marketing plan.... dropping slushies from the sky until we go buy them... that is the yuck that is outside today. So after the 90-minute school delay, I got out and did my errands as fast as I could so I could stay inside for the rest of it.
I've got several projects underway, but not much finished to show for it yet, and part of that is due to the current state of my craft area! After all the great work I did to get it in shape, I'm struggling to keep it neat so when I'm ready to work, I don't have to wade through a sea of clutter to get to it...
While I am trying to maintain my flylady routines, no school days are throwing me off, part of why I haven't added anymore baby steps yet. I get so easily sidetracked, especially when I sit down to check out some of my favorite blogs. I really am trying to use my timer, but sometimes I stop it and litterally forget I'm supposed to move on to something else! I know several things happened in between these thoughts, but I'm just going to save you the babble.... I ended up checking out my friend Debie's blog and seeing how she organized her recipes which led me to another blog hosting a year long plan of getting organized, 52 weeks of Organizing. Since I aspire to be organized, I had to check this out. Now, I actually like the process of putting things away neatly and organized, it's just the time it takes and I struggle with actually getting rid of things... but I digress... From http://www.orgjunkie.com/ I printed off this handy tool to list out the places I would like to organize and I broke it down to specific drawers to help me stay motivated (not, Organize Kitchen, but organize utencil drawer, etc).
... again, skipping some sidetracked babble...
Back to today, I stood in my craft area with an awesome bag of goodies from the thrift store, not what I went for, but they were having fill a bag for $7 sale today, and I snagged some great things to upcycle. I was dying to finish up a few projects, so I could start some new ones, but alas, my space that looked like this earlier in the month:

didn't exactly have room for me to work. Enter that nice orgjunkie list of 52 places I need to organize (ok, I don't have 52 on it yet, but I'm sure I will soon enough). I admitted earlier that I wasn't 100% complete in my organizing of this space, those two middle drawers weren't touched, and I had still have my "other crafts" bin to sort through. I always feel like I don't have enough drawers in my craft area or kitchen so I recently ordered a few of these add on drawers. I'm itching to put them together and install them, but really felt I needed to clean out those center drawers so I knew what should go into these new drawers.
So, my list has the drawers as seperate items, and since yesterday I opened the right one and couldn't close it, it was the lucky winner of today's clean out! Here is what I started with:


 My scrapbooking punches (with a smidge of room to grow), crochet hooks and knitting needles each have a seperate space. Plus, I actually had all those little connecting drawer containers that I hadn't decided if I should keep or get rid of yet, so getting this drawer in shape didn't cost me a dime!
Now, I know that was quite a long rambling post, but can you imagine how long it would have been if I didn't cut out the extra babble!?!?!?!?!?
I've got several projects underway, but not much finished to show for it yet, and part of that is due to the current state of my craft area! After all the great work I did to get it in shape, I'm struggling to keep it neat so when I'm ready to work, I don't have to wade through a sea of clutter to get to it...
While I am trying to maintain my flylady routines, no school days are throwing me off, part of why I haven't added anymore baby steps yet. I get so easily sidetracked, especially when I sit down to check out some of my favorite blogs. I really am trying to use my timer, but sometimes I stop it and litterally forget I'm supposed to move on to something else! I know several things happened in between these thoughts, but I'm just going to save you the babble.... I ended up checking out my friend Debie's blog and seeing how she organized her recipes which led me to another blog hosting a year long plan of getting organized, 52 weeks of Organizing. Since I aspire to be organized, I had to check this out. Now, I actually like the process of putting things away neatly and organized, it's just the time it takes and I struggle with actually getting rid of things... but I digress... From http://www.orgjunkie.com/ I printed off this handy tool to list out the places I would like to organize and I broke it down to specific drawers to help me stay motivated (not, Organize Kitchen, but organize utencil drawer, etc).
... again, skipping some sidetracked babble...
Back to today, I stood in my craft area with an awesome bag of goodies from the thrift store, not what I went for, but they were having fill a bag for $7 sale today, and I snagged some great things to upcycle. I was dying to finish up a few projects, so I could start some new ones, but alas, my space that looked like this earlier in the month:

didn't exactly have room for me to work. Enter that nice orgjunkie list of 52 places I need to organize (ok, I don't have 52 on it yet, but I'm sure I will soon enough). I admitted earlier that I wasn't 100% complete in my organizing of this space, those two middle drawers weren't touched, and I had still have my "other crafts" bin to sort through. I always feel like I don't have enough drawers in my craft area or kitchen so I recently ordered a few of these add on drawers. I'm itching to put them together and install them, but really felt I needed to clean out those center drawers so I knew what should go into these new drawers.
So, my list has the drawers as seperate items, and since yesterday I opened the right one and couldn't close it, it was the lucky winner of today's clean out! Here is what I started with:

I emptied the whole thing out and even used a tooth pick to clean in the gross crevices:

And after only 20 minutes (probably would have been less but I was trying to do this with O-man at my feet), I had found several things I didn't need, a small pile of trash, a big pile of recyclables, some things that belonged in other areas and I actually ended up with an empty drawer! Nothing that was in there before needed to be there, AT ALL! I took a short break to really think about what should go in that drawer.
Truth be told, I know why I can't keep my craft area in good shape, I still have too much stuff! So too much stuff ends up in piles on top of the work space. I opted for relocating two of scrapbooking storage bins from the surface (far right corner of the counter) into the now empty drawer. One of those bins has left the counter completely, and another one was filled in by a small basket of stuff that never found a home before. This is my end result:

Now, I know that was quite a long rambling post, but can you imagine how long it would have been if I didn't cut out the extra babble!?!?!?!?!?
12.30.2010
Nothing like a new toy to inspire organization
Christmas was quite the happy occasion in our household, especially for me! I was blessed to receive the two top items on my wish list, a new surger and a bias tape maker. Since I felt it necessary to give them a good home, the quest to conquer the craft pit of dispare became priority numero uno.
So, against Flylady's advice, I decided to go at it until it was done (OK, with some good nights sleeps and naps in between). I did however have a give-a-way, throw-a-way and several put-a-way bins (good Flylady advice). I started by dividing up everything by category: Sewing, scrapbooking, jewelry and other crafts.

Since there was a lot that came out of the cabinets, and wasn't going back, I worked one craft at a time and put stuff back in it's new home, labeling as I went, seriously thinking about if I would ever use it before putting it away. After two days of my ipod constantly running, I had a huge black bag of trash, a kitchen bag full of plastic bags to drop off to be recycled, 4 large boxes full of cardboard also to be recycled and 2 large bags of give away (already picked up by the VETS!).
 I do still have a large basket of items to be passed on to other people, a lamp to decide what to do with and the two big drawers still haven't been touched. The picture really doesn't do it justice but I took it with the cabinets doors open to show that nothing is stuffed in, it is all grouped together and labeled, maybe this helps:
So, against Flylady's advice, I decided to go at it until it was done (OK, with some good nights sleeps and naps in between). I did however have a give-a-way, throw-a-way and several put-a-way bins (good Flylady advice). I started by dividing up everything by category: Sewing, scrapbooking, jewelry and other crafts.

I took everything off the floor and counter tops and put it into the correct bin. This enabled me to look at the stuff that was already in the cabinets, something I knew needed to be done, but had been avoiding. Filling the bins was the fastest part of the process:
 |
| The original bins really are under there, it always looks worse before it looks better |

 |
| I knew all that Chinese take out would benefit me later! |
So, my new toys have a clean home and hopefully, I will be using them regularly very soon. We have a few days left of Winter Break and a few projects I want to do with the kids before then, so my toys may have to wait, but at least they won't be claustrophobic while they wait.
The rest of the house on the other hand required some Flylady crisis cleaning to be ready for my parents delayed visit.
Subscribe to:
Posts (Atom)
